slowmoVideo
Documentation
Article en Fran??ais: slowmoVideo, ou comment arr??ter le temps
slowmoUI (the user interface for slowmoVideo) supports normal shortcuts via the menu and additional shortcuts that can be displayed by presshing h
. Combined shortcuts like Save as (s-a) are triggered by typing sa
. If you wait longer than about half a second between two key strokes, the shortcut status will be reset.
New project

New projects should be created in an empty directory. You can either select a video file or a bunch of images (e.g. from a timelapse sequence). After pressing Ok, slowmoVideo will save the project and start extracting frames.
Curves
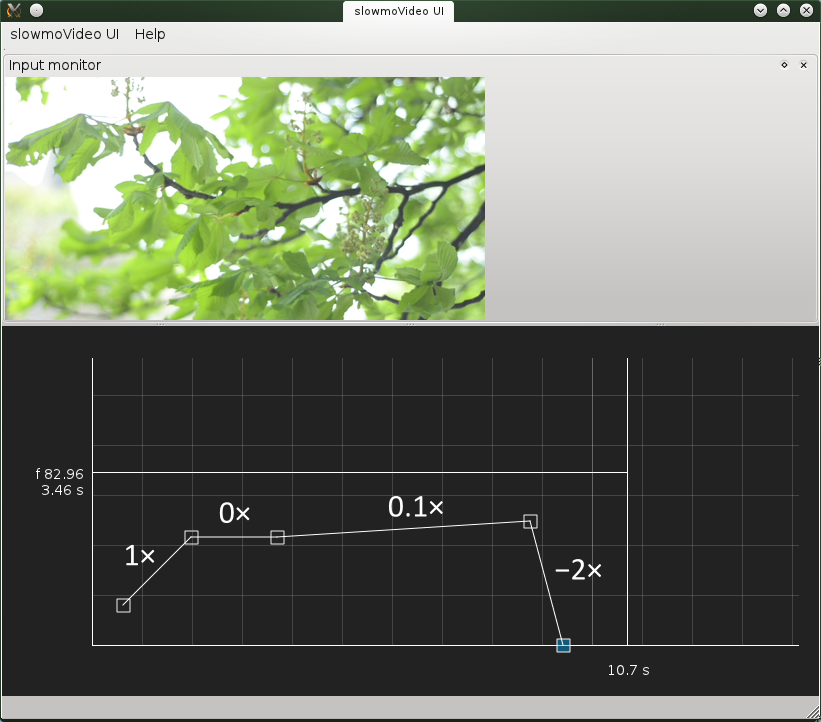
The canvas now is your playground. It has two axis:
- The vertical source axis where the frame number is displayed at the current cursor position. Imagine a reel of film rolled out along this axis. This is how it works. The first frame is at the bottom, the last frame is at the fat line that becomes visible when zooming out with Ctrl+Mousewheel.
- The horizontal output axis will be the rendered video. Now if you draw a curve, what slowmoVideo does is that for each output frame it draws a vertical line and looks where it crosses your curve. From this point it goes left until it hits the source axis and takes the frame at this position. Drawing is done by creating nodes (double click on canvas). Nodes will be connected by a line.
With this information you see that, in the picture on the right, the first line plays the video at its original speed since the time passed on the output axis is the same as the time passed on the source axis. The second line stops the video, the third line plays it at low speed (maybe 7 %). The last line plays the video in reverse direction.
Hint???If you have difficulties understanding the curves: imagine that you are walking on the canvas from left to right. On the left, i.e. behind you when walking, there is a wall showing all frames of the video you recorded, one after another, starting at the bottom. Each step you do is a frame, and as you walk, you take a look back at the wall after each step. If you walk on a straight line from left to right, you always see the same picture. If you walk from bottom left to top right, you have eventually seen the whole video. Now let???s allow to move arbitrarily from bottom to top or back, and just count the steps to the right. Take one step to the right and three to the top, and when looking back at the wall, the frames pass three times faster. Or take ?? step downwards instead, and the frames play in reverse at ?? speed.
The monitor at the top (can be dragged around, by the way, it???s a Qt4 widget) displays the source frame at the mouse position.
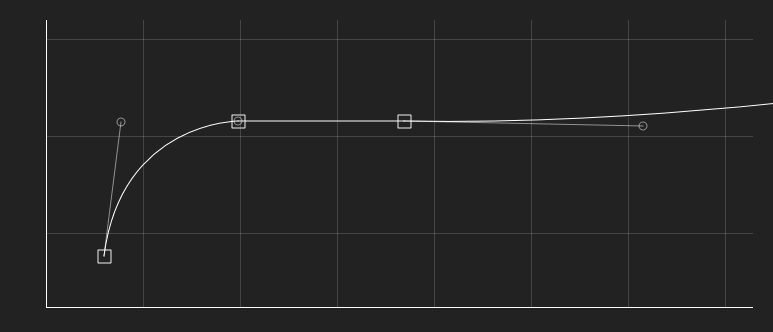
slowmoVideo also supports B??zier curves. A segment can be changed from linear to B??zier (and the other way round) by right-clicking on it. The reason why you absolutely want to use them is that the speed does not change abruptly from 1?? to ????, for example, but very smoothly.
You may notice that the B??zier handles cannot be moved: This is wrong however. Nodes have priority, but by holding Shift
they are ignored. This is how you can drag them and create a wonderfully smooth curve.
Markers
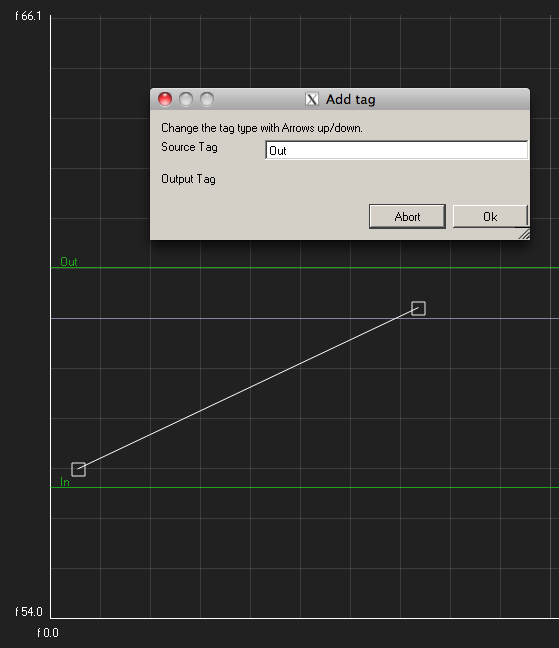
SlowmoVideo gives you also the possibility to add markers to your video material. Markers are helpful for orient yourself in long videos, you can mark Ins/Outs for some parts of the whole video. To add a marker, simple double-press the T-Key and a popup appears, where you can name your marker.
Motion Blur

Motion blur is mainly thought for making videos with higher replay speed look more real. Quickly moving objects would blur normally, but when accelerating a piece of video simply by ???take each 3rd image??? motion blur is reduced to a third of the original value. This option fixes this.
To add motion blur on a segment (the line between two nodes), right-click on it and select Set/edit shutter function. The function can use several parameters; the most important one is the number of frames per second. For a film-like 180 degree shutter[1], which is half the frame time, you would enter return 0.5 * 1/fps;
??? for 24 frames per second this would return 0.5 * 1/24 s = 1/48 s.
Now this is only correct if the video is re-played at 1?? speed. If the curve you define plays the video at 10?? speed, 10?? as many input frames are played, so the shutter should be 10?? as long as well. The dy
variable is exactly what you need now: It contains the input time that is covered by the current frame, which for 10?? speed would be 10/24 s. So, the correct expression is: return 0.5 * dy;
If you are a coder ??? this is QtScript which is mainly ECMAScript (JavaScript).
Rendering
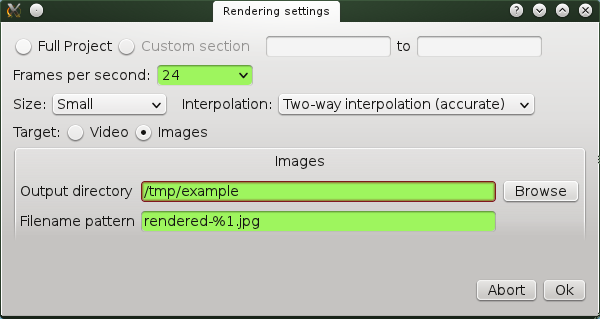
Finally you will want to render your project. Why all the colours, you may wonder? Green indicates correct values, red indicates invalid values. When rendering to images, the filename pattern must contain a %1
(which will be replaced by the frame number), otherwise the field will be red and you cannot start rendering. (Try it!)
Since rendering is a time-consuming process, you might want to render with the small resolution first and check if you like the result. If you do, chose the original frame size and go have a big lunch since it will take some time :)
Flow editing
Some rendering artifacts can be removed by editing the optical flow.
Command Line Examples
To make a video 5x slower:
/usr/local/bin/slowmoRenderer -target video /root/timelapse/test.mp4 auto -input video /root/timelapse/timelapse.mp4 -slowfactor .2 -start :start -end :end -interpolation twoway2 -size orig
To interpolate additional frames in a sequence of images:
# Note: The formattingPattern (???) for input source is unclear. > /usr/local/bin/slowmoRenderer -target images /root/timelapse/interpolated/%1.jpg -input images ??? /root/timelapse/source_images/ -slowfactor .2 -start :start -end :end -interpolation twoway2 -size orig
Links
- ^ See e.g. 180 Degree Shutter ??? Learn It, Live It, Love It for an explanation of the 180 ?? shutter.